Your professional website is an important part of your freelance writing business. But they often go neglected.
If your site is built on one of the most popular content management systems, WordPress (the self-hosted open source version; not the hosted .com version, which I never recommend), that neglect might come down to maintenance and basic WordPress security.
I’ve helped quite a few colleagues with their WordPress sites over the years. And I feel like nearly every time, I’m left saying:
“I’ve never seen anything like that before.”
Not in a good way.
Too many writers put up professional sites on dynamic platforms but treat them like static brochure-style sites. You can’t do that. These platforms receive regular updates. And their popularity means they’re often targeted by bad actors.
Today I want to share some basic tips on how you can keep your WordPress site safe and secure. Or at least more than it is now. Keep in mind, these tips will help. But they aren’t a guarantee. That also depends on the work of developers and your host.
Let’s dive in.
2 WordPress Security Mistakes Writers Often Make
I want to start with two of the biggest mistakes I see from colleagues. I touched on these in a recent All Freelance Writing newsletter.
Mistake 1: Assuming a WordPress Site is Up-to-date Because it Shows No Update Notices
If you’re familiar with WordPress, you’ll know it shows notices or alerts when you have updates waiting. This is true for core updates as well as theme and plugin updates.
The problem I keep coming across is colleagues who think their site is up-to-date because they aren’t seeing these notices. No new updates waiting to be installed means you’re good, right?
Wrong.
Those update notices only appear if the plugin or theme is being actively updated by its developer.
If a theme or plugin is abandoned, or if you’re running a severely outdated core installation that doesn’t receive support anymore, you could have insecure code on your professional site. That puts you at risk of being hacked and losing your site.
Equally important, many attacks are injection attacks. They could inject links to malware or phishing sites onto your site, and you would never know if you didn’t check. However, any prospect visiting your site is at risk of clicking those injected links and becoming a victim of the attack because you didn’t do basic maintenance.
What to do about it:
1. In your WordPress admin area, click “Plugins” in the left navigation links.
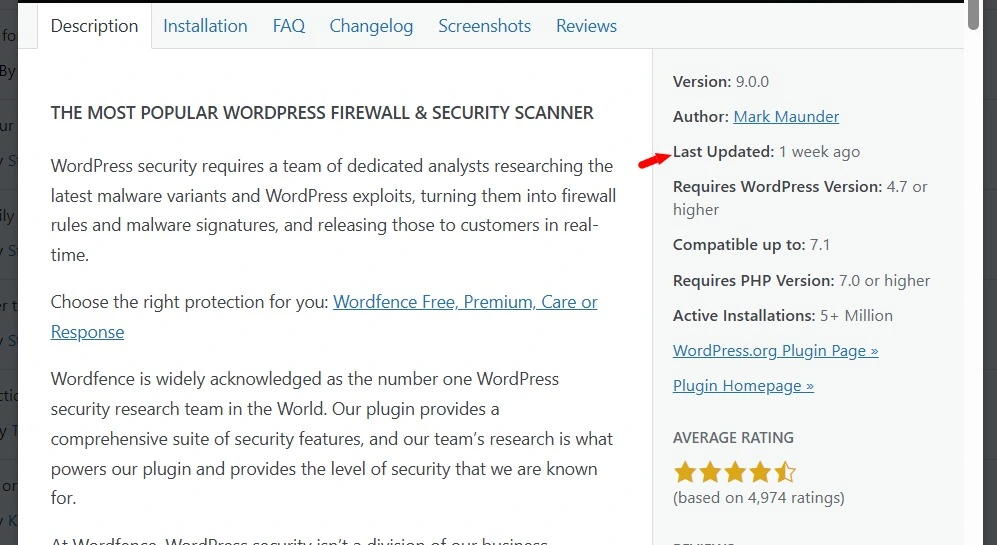
Click on each plugin’s “view details” link. You’ll see a screen like the one below.
On the right side, it will tell you when that plugin was last updated. It should also tell you if the plugin was officially tested with your current version of WordPress.
While you’re in your Plugins screen, do some basic housecleaning.
Remove plugins you don’t actively use in addition to any that are abandoned by their developers. You should never have a bunch of deactivated plugins sitting on your site.
The fact that they’re deactivated doesn’t make them safe. The code can still lead to exploits, and you’re leaving yourself even more to maintain.
2. Look at the left navigation links again. Under “Appearance” choose Themes.
Again, you’ll want to remove themes you aren’t using because every extra one is a potential attack vector.
The general rule is to keep your active theme plus the most recent default theme so you can quickly switch to it for testing if you have theme or plugin conflicts later.
Note: If you’re using a “child theme,” you should also keep the base theme your child theme is built around. Your child theme won’t work if you remove the theme it’s tied to.
Update any remaining themes if necessary. Hover over a theme and click “theme details.” Enable auto updates for the themes still on your site.
To check if they’re abandoned, you’ll need to go to the WordPress theme repository. Search for the theme by name to view it’s last updated date.
3. Set up a regular schedule to check your themes and plugins beyond regular updates.
And have a regular update schedule if you haven’t set all plugins, themes, and core WordPress files to update automatically.
My personal preference is to set automatic updates for minor and security updates.
That said, I use the same plugins and themes on most sites, and there’s rarely a day I’m not on one to see if updates come through. I check every site weekly beyond automatic updates, and if I see an update come through any other day on any site, I update them all.
If you don’t check your site often enough to stay on top of updates, consider having all updates automated. There’s a risk of compatibility issues, but if it comes down to that or being hacked when an exploit surfaces, a compatibility issue is easier to work around.
To enable core updates, log into your hosting account’s file manager (mine use an admin called cPanel, but yours might be different).
Find your WordPress core files, and you should see one called wp-config.php.
First, make sure the file permission settings are set to 600 (you should see permission numbers like this in the file list; if not, ask your host). This often defaults to 644. Setting it to 600 keeps this important configuration file (which includes your database login details) more private.
Open wp-config.php and go down to where you see:
“That’s all, stop editing! Happy blogging.”
Right before that line, add this if you want to enable automatic minor and security updates for the WordPress core files.
define( 'WP_AUTO_UPDATE_CORE', 'minor' );
If you want to enable all core updates to run automatically, change “minor” to “true.”
Mistake 2: Assuming Your Host is Protecting You
It makes sense that if you’re on a common shared hosting plan, you would assume your host is keeping things secure on the server side.
But not all hosts are created equal.
In two recent cases, I helped out colleagues using the same major hosting company. And they both had issues the host should have addressed.
One was running an end-of-life version of PHP on the server. While you might be able to change your site’s PHP version in cPanel or whatever control panel your host uses, the host itself has to install the versions on the server and make them available to your account.
In these cases, the same host didn’t make the same PHP versions available to both customers.
One had an an up-to-date version installed (8.3) with 8.4 and 8.5 available.
The other was still running on something like 7.2 (no longer supported) and was only able to update to 8.3, which is what we did.
Note: PHP 8.2 will be supported through December 2026, so if you’re on that or anything lower, it’s time to update.
In the second colleague’s hosting account I could see their MySQL version (tied to your WordPress database) was also end-of-life.
In this situation, the colleague couldn’t run an update themselves. It has to be done at the host level because shared hosting customers won’t have root access. That’s 100% on the host to keep up-to-date.
They didn’t.
What to do about it:
Log into your hosting account’s control panel and look for information about your server.
See if you can find the current PHP and MySQL versions tied to your site or domain.
If they’re outdated, you might have to contact your host to get this fixed. Don’t sit back and assume they’re keeping you up-to-date and secure.
More WordPress Security Tips
While keeping your site and server up-to-date are important, there’s much more to WordPress security. This is still not an exhaustive list, but here are some additional steps you can take to keep your site safe:
1. Disable on-site theme and plugin editing.
By default, under the “Appearance” menu in your WordPress admin area, you’ll find options to edit theme and plugin files. This will display their code on your site for quick editing.
The problem?
If someone ever got into your account (such as by injecting a new admin users as was seen in the recent July 17th core WordPress exploit), they’d have direct access to these files.
There’s no good reason to keep this enabled. You can edit these files directly by logging into your hosting account’s file manager.
Start by going into that file manager. Go back to the wp-config.php file you edited earlier. Go right back to where you added the line about core updates. Underneath that line, add this to disable on-site theme and plugin editing:
define( 'DISALLOW_FILE_EDIT', true );
2. Install (& Configure) a WordPress Security Plugin
My preference is Wordfence. Even the free version is fine. These plugins will monitor for things like unexpected file changes that could signal your site is compromised. They can also protect against bot traffic, brute force login attacks, and more.
If you have no security plugin yet, install the free version of Wordfence.
To do that, go to “add plugin” under “Plugins” in your WordPress admin left navigation bar. Near the upper right of that screen, search for Wordfence. Install it, then activate it.
Basic Wordfence Configuration
Here are some basic Wordfence configuration options to get you started:
Set up Extended Protection
Once Wordfence is activated (and you’ll need to register for the free license), click “Wordfence” in that same left navigation bar. Look for a link near the top called “manage firewall.” Click it.
Then check the center section under “Protection Level.” Here you want to enable extended protection. If it offers to let you download your .htaccess file first, do it so you have the backup.
Save things and make sure it says extended protection is active.
Activate Automatic Wordfence Updates
In your WordPress Admin’s left navigation links, under the Wordfence section, click “all options.”
Scroll to, and expand, the section called General Wordfence Options.
Check the box to update Wordfence automatically. Then click the button near the top right of the screen to save your changes.
Disable Code Execution & Hide WordPress Version
In the same section where you just activated automatic Wordfence updates, scroll down a bit and check:
- Hide WordPress version
- Disable Code Execution for Uploads directory
The code execution one is more important. It essentially prevents executable code from being injected into your uploads folder’s files to have that code run by hackers.
Set Wordfence Email Alerts
On that same “all options” screen, scroll to the section called “Email Alert Preferences.”
These options will have Wordfence email you in certain circumstances. If you’re the only user account on the site, I recommend getting alerts if any other users, admin or otherwise, sign in. This could signal you were hacked and new user accounts were set up.
Choose the settings that make sense for your site here. It will depend on if you have other user accounts, another admin, etc.
Again, save your settings.
Wordfence Brute Force Protection
A brute force attack is when a potential hacker uses automated tools to rapidly try different passwords against a username, trying to log into your site.
Not only does this pose a risk of being hacked, but these attacks can also use a lot of server resources. And if you’re on a shared account, those resources are limited. While your host should have some protection against this, never rely on that.
On that same “all options” screen, scroll to the “Brute Force Protection” section.
You’ll see settings about how many login attempts to allow over a certain period of time. If someone fails enough times in your time limit, their IP address gets blocked.
For this site, I set that to 5 login attempts or 5 forgot password attempts over 4 hours, with a 4-hour IP block for anyone who fails. This stops the same IP address from consistently hitting your site.
You can set this looser or much stricter. I tend to be stricter on one-user sites and looser on ones with legitimate other users that might forget their usernames.
In this same section, check the box by “immediately block the IP of users who try to sign in as these usernames.”
Note: Check your own username first! If it is currently “admin” or “administrator,” skip this step until you set up a new admin account and migrate everything to it. You should never use these as your actual admin account usernames.
As long as your own username is different, add two usernames to this blocklist: admin and administrator.
Those usernames are often targeted in brute force attacks.
I recommend you also block passwords found in data breaches in this section for admin accounts.
Note: You should never re-use passwords for multiple accounts, and they should ideally be randomly-generated and saved in a password manager. If you don’t know if your current password was found in data breaches, change it as a precaution.
Save your settings.
More Recommended Wordfence Settings
Go to the “Additional Options” section on the same “all options” screen.
Check off all of the following:
- “Enforce strong passwords” and set it to at least cover admin accounts.
- “Don’t let WordPress reveal valid users in login errors.”
- “Prevent users registering ‘admin’ username if it doesn’t exist.”
- “Prevent discovery of usernames…”
- “Disable WordPress application passwords” (unless you know you’re using this feature; if you don’t know what it is, it’s highly unlikely you’re using it).
- “Check password strength on profile update.
Save your changes.
Below this, you’ll also find rate limiting settings. This can slow down / throttle bot traffic. This goes beyond the security things we’re covering here, but you can set whatever limits you find reasonable or leave the default settings alone unless you find bot traffic is slowing down your site.
Wordfence Scan Settings
On that same “all options” page, scroll down to the Scan Options section and the “general options” group under that. Expand it.
My preference is to check every box in this section.
Save your options.
At this point, your basic Wordfence settings are complete. So run your first scan.
Click “scan” under the Wordfence section in your admin screen’s left navigation bar.
Click the “Start New Scan” button.
Come back and review the results when the scan has a chance to finish.
3. Set up an Anti-Spam Plugin
WordPress comes with Akismet installed as an anti-spam plugin. I’m not a fan. In my experience, it used to block legitimate commenters enough that I couldn’t trust it.
I’ve used quite a few over the years including CleanTalk and another that’s no longer supported. These days I mostly use WP Armour.
That said, I use the premium version on all of my sites. I’m a fan because it not only works well, but it works with all the specific plugins and such I use on a regular basis and want spam protection for.
That does not mean it’s the right plugin for you. Keep Akismet. Try the free version of WP Armour. Use CleanTalk. Just choose one that does what you want it to do, and install an anti-spam plugin.
The bare minimum is it should protect your comment form and contact forms. Your login forms should be protected by Wordfence or another login protection plugin.
4. Complete a Quick Account Check
In that left set of navigation links in your WordPress admin area, click “Users.”
In most cases, you’ll be the only user on that site, and you’ll have administrator privileges.
If you see any additional administrator accounts, it could be a sign you were hacked, or maybe you gave someone access in the past and forgot to remove the account (such as for a theme or plugin support rep).
If the accounts aren’t ones you want on your site, remove them, or at least lower their permissions to “subscriber” until you sort out whether or not you need to keep that access.
5. Backup. Backup. Backup!
We’ve saved the best for last… and sometimes the most neglected thing on this list: backups.
There’s no excuse not to have frequent backups of your site files and databases if you run a WordPress site.
I’ve watched people lose years’ worth of work because they didn’t. You’ve worked far too hard to let that happen.
Now, here’s what I do not recommend: WordPress backup plugins.
In my experience, they tend to add bloat. They can cause problems where you think you’re backed up only to find things don’t restore properly. And frankly, they just aren’t necessary.
First, check in your hosting account. You might be able to set up automatic backups there. They should not be your only backups. And you should make sure you’re only saving as many as your account can support.
Another big mistake I’ve seen writers make is keeping huge bloated backups on a server not meant to support them on shared accounts.
Go into your host’s control panel and look for backup settings. In cPanel, you’ll see a “Backup” link in one of the boxes (the order and style can vary by host).
When you go to that backup page, you can simply click on a database link to automatically download it. That’s it. One click.
That’s the main update you want to do frequently, especially after publishing new content or before making significant site changes.
You’ll also see a “home directory” button. Clicking that will download all your site files and more, so you don’t have to worry about compressing your wp-content folder and downloading it separately.
On a cPanel account, you’ll also have the option for a full account backup. This will take longer to run, and you’ll have to come back later to download it. It’s more important if you want to migrate to a different cPanel host in the future.
These are bare bones basic backups.
If your host keeps full account backups on the server, great.
If you can automate database backups, great.
But at a bare minimum, set up a schedule that makes sense to run some manual backups.
I do weekly database backups and monthly site file ones unless I make changes to a particular site. If you don’t update your site much, you might get away with fewer.
Do not simply assume your host will have recent backups if your site gets hacked or otherwise goes down. Sometimes your host is the reason you’ll want backups of your own.
Remember the 3-2-1 rule of backups:
- 3 backup copies
- 2 or more mediums
- 1 off-site
Here’s what I do:
- I keep the most recent backups on my main hard drive.
- I keep some older ones and periodic newer additions on a second hard drive in the same PC.
- I keep several backups for each site on an external hard drive.
- My server keeps automatic full-account backups for all accounts I have, and I have it save two at any given time (these can get quite large).
- And I keep key ones available on DropBox in the cloud if anything happened to all local backups at once.
Hard drive, external drive of some kind, and a cloud service – that’s the minimum to make sure your data is safe and ready to be restored if you ever need it.
By no means are these tips exhaustive when it comes to WordPress security and basic maintenance. But they’ll likely make your professional website more secure than it was before.
Keep in mind, a lot of that security comes on the server side. So do some digging into your host and whether or not it has a good reputation of reacting quickly to threats.
If you find anything like PHP or MySQL versions that are not supported anymore, contact your host’s support and ask them to upgrade those things.
If they try to charge you more for this basic maintenance that’s their responsibility, do a complete account backup and find a more reliable host.
Don’t let these improvements give you a false sense of security. Stay aware of any new accounts that show up on your site, pay attention to plugins and themes especially if they haven’t received updates in a while, and keep an eye out for any unexpected content (or changes to content) on the front-end of your site.
